Lengthy postings prove their authors have put considerable amounts of work into assembling them. However, structuring text using paragraphs and headlines is sometimes not sufficient to allow for an easy navigation. Adding a simple hypertext navigation can provide a remedy.
Adding an Anchor | Inserting the Navigation: Underneath Teaser | Above Teaser
There are several ways to create navigations, which require varying effort. This howto will guide you through the process of adding the most basic, yet surprisingly effective, form of a navigation.
Assume you have just finished writing your article. Paragraphs and bold headlines already constitute a visual structure.
The first step we need to do for adding a navigation is insert jump marks, which are called "anchors" on linksunten. A good place for anchors is immediately before a headline.
To add an anchor, place the text cursor at the desired position (e.g. before a headline) and click on the anchor icon in the toolbar.
A window "Anker einfügen/verändern" (Add/edit anchor) pops up. Enter the desired anchor name without any whitespaces or special characters.
You will need to remember this name when adding the actual navigation later on, so choose something short and obvious. When in doubt, just jot the names down on a piece of paper. Click on "Einfügen" (Insert). A small anchor appears at the text cursor position: ![]() Please note that your readers will not see this picture when reading your publication. It is just displayed for your convenience during the editing process.
Please note that your readers will not see this picture when reading your publication. It is just displayed for your convenience during the editing process.
Repeat this procedure for every text passage/headline you want to reference in your navigation. Please note that all anchors need to have unique names.
Now you are ready to insert the actual navigation. On linksunten, the navigation is usually placed underneath the teaser. You have two options: Placing it before the teaser break so that it will also appear on the front page, together with the rest of the teaser; or placing it directly underneath the teaser break. As the former is far more complicated, I will first describe the second option here.
Navigation directly underneath the Teaser Break
Position the text cursor directly underneath the teaser break and insert two blank lines.
If there is not yet a teaser break in your article, add one first by clicking the respective icon in the toolbar: ![]()
Now write a list of navigation entries in the second blank line. This will become your navigation. The entries are usually termed like their corresponding headlines, but if those are too long, better choose something more succinct. Separate the different entries by spaces and | signs (Shift-\ on US-american keyboards). Add another blank line after the navigation to separate it from the rest of the text.
This "navigation" is not yet functional. Until now, it's just some more ordinary text. Let's change that.
Select the first entry using your mouse and click on the "Link einfügen/verändern" (Insert/change link) icon.
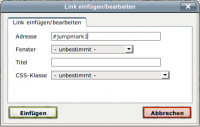
A window pops up. In the first input field, enter the "sharp" sign #, followed by the name of the anchor this navigation entry shall jump to. (Now you see why it's important to use short and easy-to-remember anchor names!) Please don't forget the leading #, as it's vital for our navigation to function properly. Once you're done, click "Einfügen" (Insert).
Repeat these steps for all navigation entries.
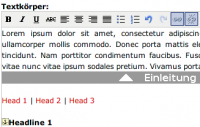
Your navigation should now look like this:
You can now preview your article and test if the navigation items work and jump to the correct text positions. If they don't work, your anchor names and navigation references don't match, or you've forgotten to insert the # character during the last steps. Format the navigation to your liking (bold, italic, ...) and save your article.
Navigation directly above the Teaser Break
...todo...


^_^
German?
Spaeter vielleicht
Wir hatten eine konkrete Anfrage eines englischsprachigen linksunten-Nutzers, fuer den ich dieses Howto gestartet habe. Ich hoffe, dass es auch anderen Leuten hilft :) Eine Uebertragung ins Deutsche werde ich zu einem spaeteren Zeitpunkt vielleicht durchfuehren. Ansonsten steht es natuerlich auch jedem frei, den Text zu uebertragen -- linksunten unterstuetzt Artikelversionen in unterschiedlichen Sprachen.
German??
Do It Yourself: linksunten.indymedia.org/de/node/46272/translate
bla bla bla .. danke für nichts
kann nich jeder englisch